
Connecting Entra ID
Register the Trustle application to automate privileged access management for Entra ID
Overview
Microsoft's best practices are to register the Trustle application with the necessary permissions to analyze your Microsoft Azure and Entra ID (formerly Azure AD) environment. The app registration operates with permissions to analyze user access patterns and modify group memberships across your Microsoft environment.
NOTE: Microsoft uses a single, unified API, so Trustle only needs to be registered as an application once for both Azure and Entra ID to be connected.
What you'll need to connect Trustle:
- Global Administrator access to your Microsoft Entra ID tenant
- To create an application registration and copy 3 items for Trustle setup:
- The Tenant ID
- The Application (client) ID
- Client secret
- Log Analytics Workspace ID
Step 1: Gather Your Microsoft Environment Information
Trustle needs to understand your Microsoft environment structure to properly configure this integration.
Instructions:
- Sign in to Microsoft Entra Admin Center
- Go to https://entra.microsoft.com
- Sign in with your Global Administrator account
- Find Your Tenant ID
- In the left sidebar, click "Overview"
- Under "Basic information," locate the "Tenant ID"
- It will be a GUID format like:
12345678-1234-1234-1234-123456789012 - Copy this ID - you'll need to enter this into Trustle
- Record Your Primary Domain
- In the same Overview section, note your "Primary domain"
- This will be something like
yourcompany.onmicrosoft.comor your custom domain
Why Trustle needs this: This information helps Trustle understand your Microsoft environment structure and ensures Trustle covers all users, groups, and applications in your organization.
Step 2: Create the App Registration
You'll create an app registration specifically for Trustle with the necessary permissions to manage your Microsoft environment.
Instructions:
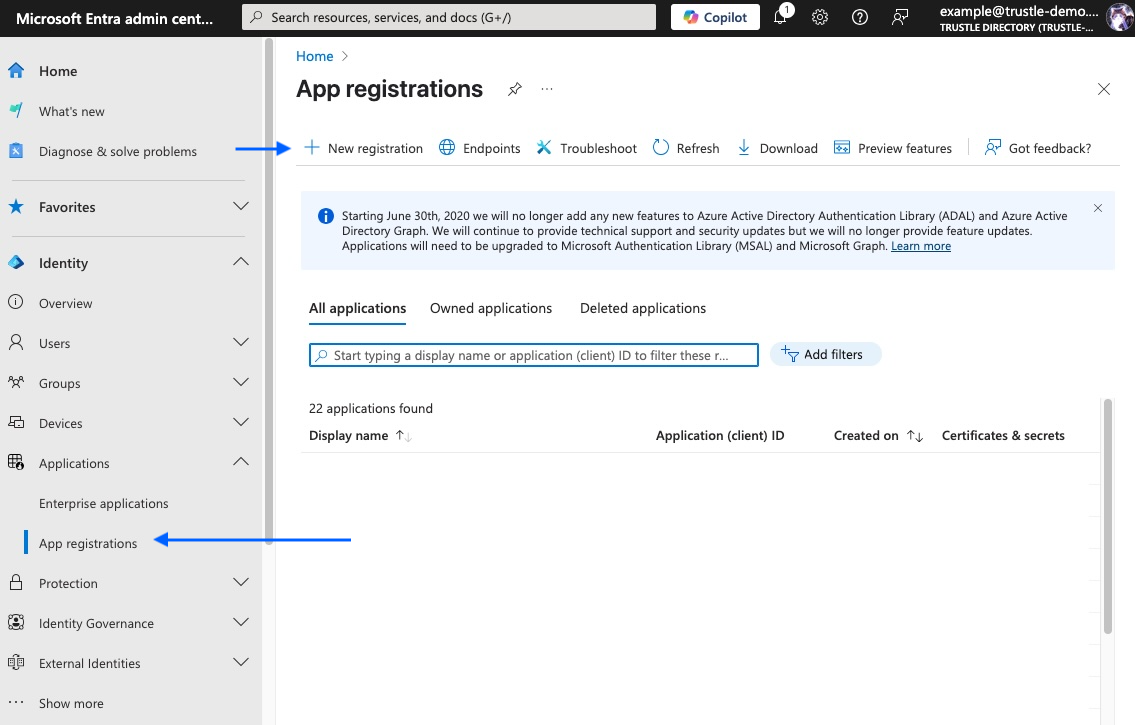
- Navigate to App Registrations
- In Entra Admin Center, go to "Applications" > "App registrations"
- Click "New registration"
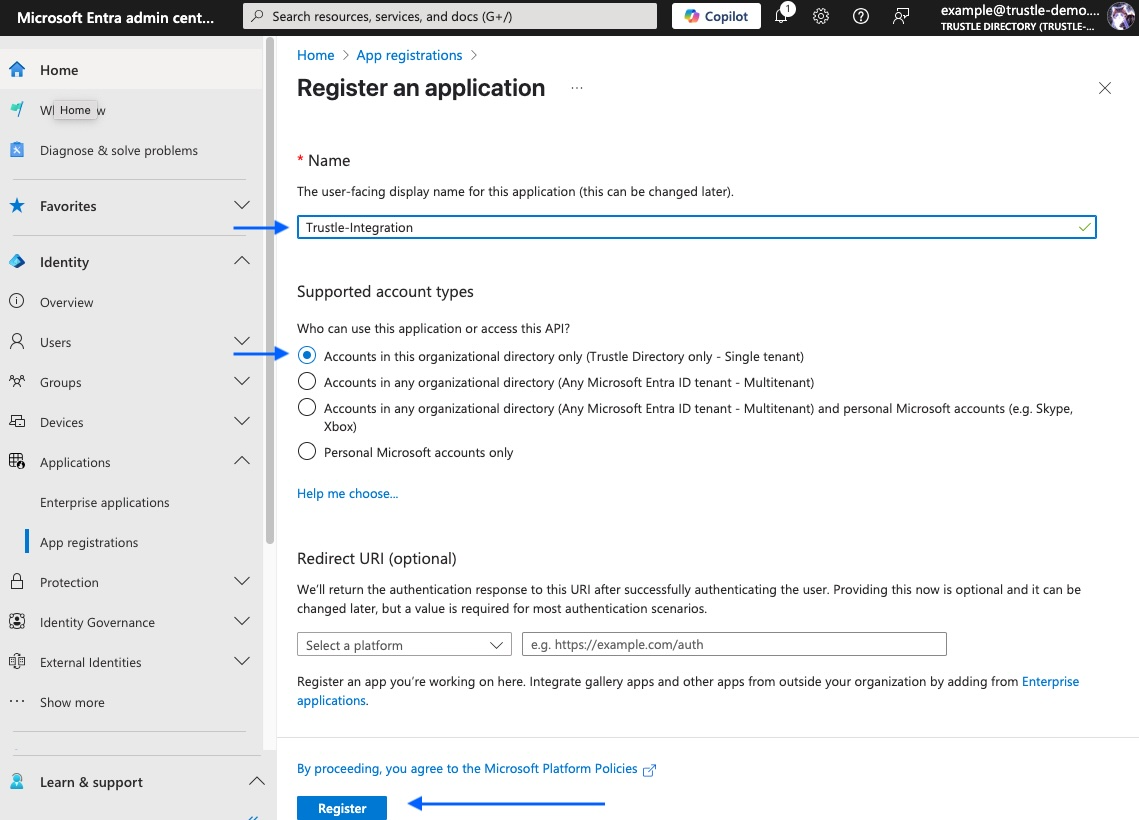
- Configure Basic Registration
- Name: Trustle-Integration (or similar descriptive name)
- Supported account types: Select "Accounts in this organizational directory only ([YourTenant] only - Single tenant)"
- Redirect URI: Leave blank (not needed for Trustle)
- Click "Register"
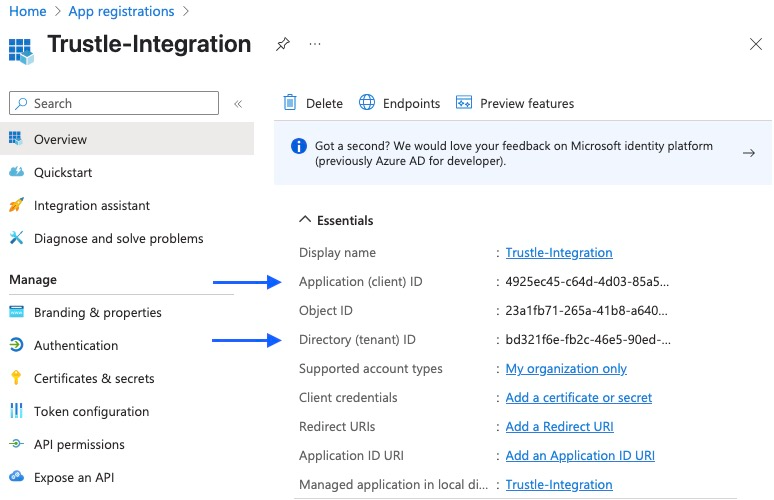
- Record Application Information
- After creation, you'll see the app overview page
- Copy and save these values:
- Application (client) ID (e.g.,
09e9d206-afc7-4192-8283-697ae865ee00) - Directory (tenant) ID (should match Step 1)
- Application (client) ID (e.g.,
- You'll provide these in the Trustle UI
Security Note: This app registration will have access to your Microsoft environment for IAM purposes only.
Step 3: Create Client Secret for Authentication
The app registration needs credentials to authenticate with Microsoft APIs.
Instructions:
- Navigate to Certificates & Secrets
- In your app registration, click "Certificates & secrets" in the left menu
- Click "New client secret"
- Configure the Secret
- Description: Trustle-ClientSecret
- Expires: Select "24 months" (recommended for stability)
- Click "Add"
- Copy the Secret Value
- IMPORTANT: Immediately copy the "Value" field (not the Secret ID)
- The value looks like:
abc123def456ghi789~jkl012mno345pqr678 - This value will only be shown once - store it securely
- You'll enter this into Trustle along with the client ID
Critical: The client secret cannot be retrieved again after you navigate away. If lost, you'll need to create a new one.
Step 4: Configure Required API Permissions
This step grants the specific permissions Trustle needs to analyze your Microsoft environment.
Instructions:
- Navigate to API Permissions
- In your app registration, click "API permissions" in the left menu
- You'll see "Microsoft Graph" with basic permissions already present
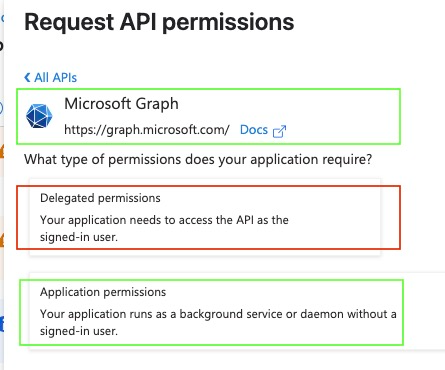
- Add Microsoft Graph Permissions
- Click "Add a permission"
- Select "Microsoft Graph"
- Critical: Choose "Application permissions" (not Delegated permissions)
- Add Each Required Permission Add these permissions one by one:
User Management Permissions:- Search for and select:
User.DeleteRestore.AllUser.EnableDisableAccount.AllUser.Invite.AllUser.ManageIdentities.AllUser.ReadWrite.AllUser.RevokeSessions.All
- Search for and select:
- Group Management Permissions:
- Search for and select:
Group.ReadWrite.All - Search for and select:
GroupMember.ReadWrite.All
- Search for and select:
- Application Management Permissions:
- Search for and select:
Application.Read.All - Search for and select:
AppRoleAssignment.ReadWrite.All
- Search for and select:
- Audit and Directory Permissions:
- Search for and select:
AuditLog.Read.All - Search for and select:
Directory.Read.All
- Search for and select:
- Grant Admin Consent
- After adding all permissions, click "Grant admin consent for [Your Organization]"
- Click "Yes" to confirm
- Verify all permissions show "Granted for [Your Organization]" with green checkmarks
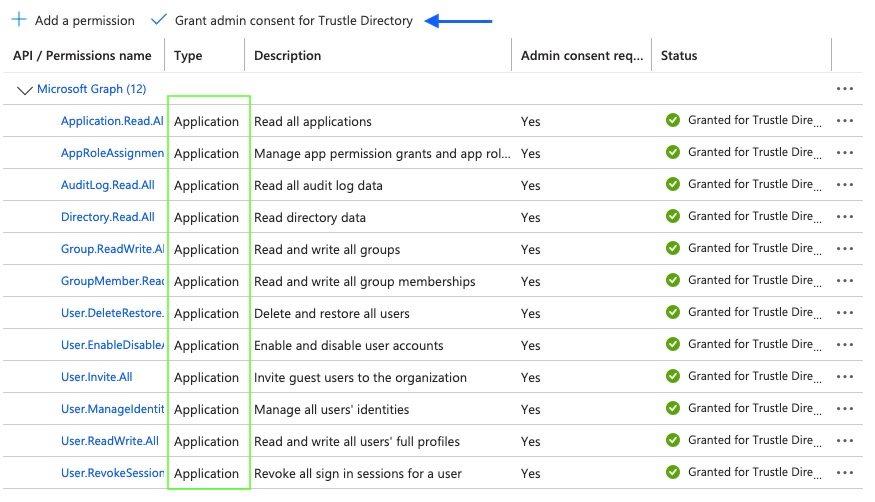
What these permissions allow Trustle to do:
- User Management: Analyze, create, disable, and delete users
- Group Management: Analyze and manage group memberships
- Application Assessment: Analyze app registrations and role assignments
- Audit Review: Analyze sign-in logs and privileged events for access patterns
Step 5: Assign Subscription Level Role
This will allow Trustle to analyze Azure RBAC roles within a subscription
Instructions:
- Navigate to the desired Subscription in Azure
- Search “Subscriptions” in the search bar
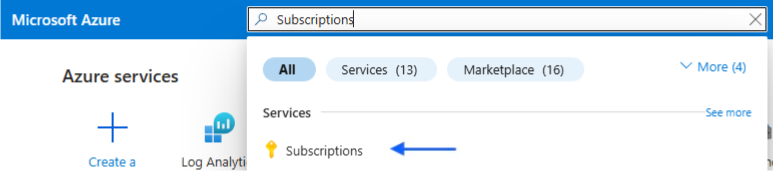
-
- Click on the desired Subscription
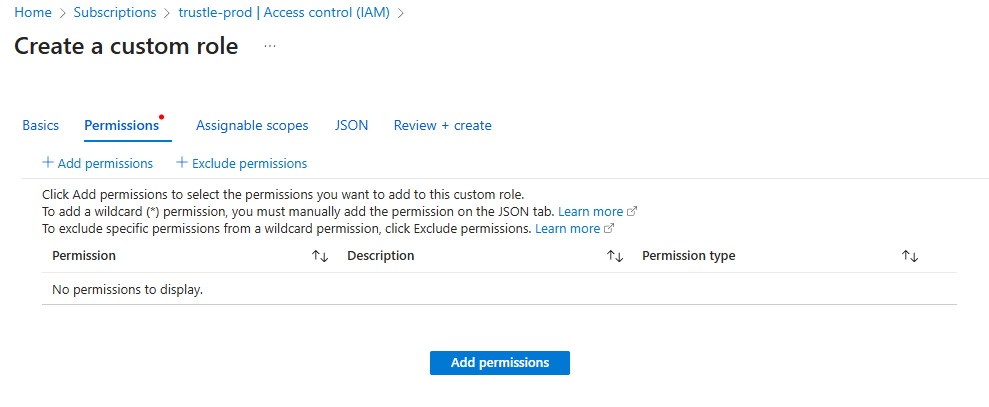
- Add a Custom Role
- In your subscription, click “Access control (IAM) and “Add a custom role”
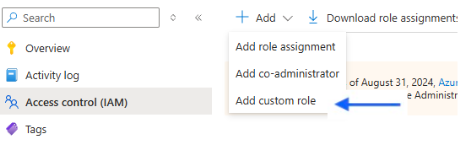
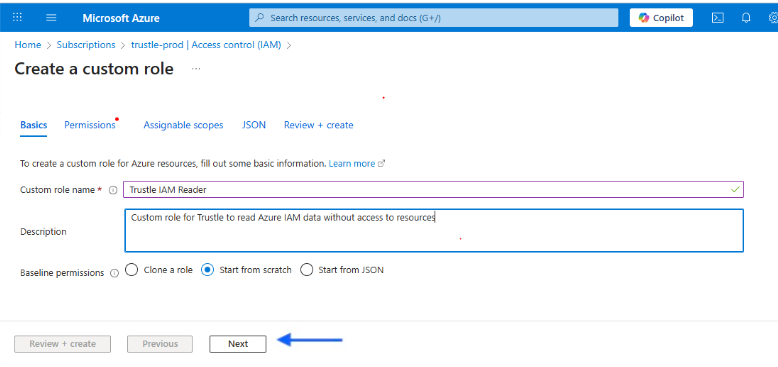
- Select a name like “Trustle IAM Reader” and click “Start from scratch”. Then click “Next”
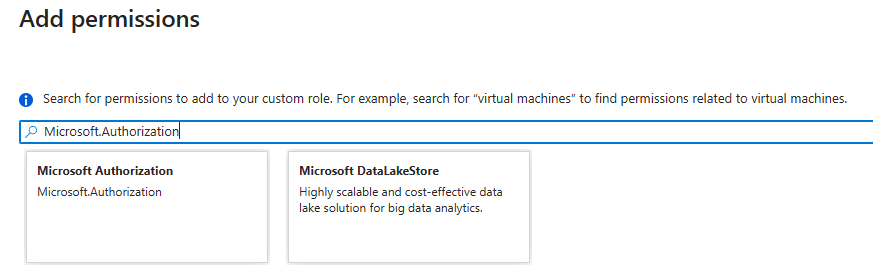
- Select “Add permissions”
- Search and select Microsoft.Authorization”
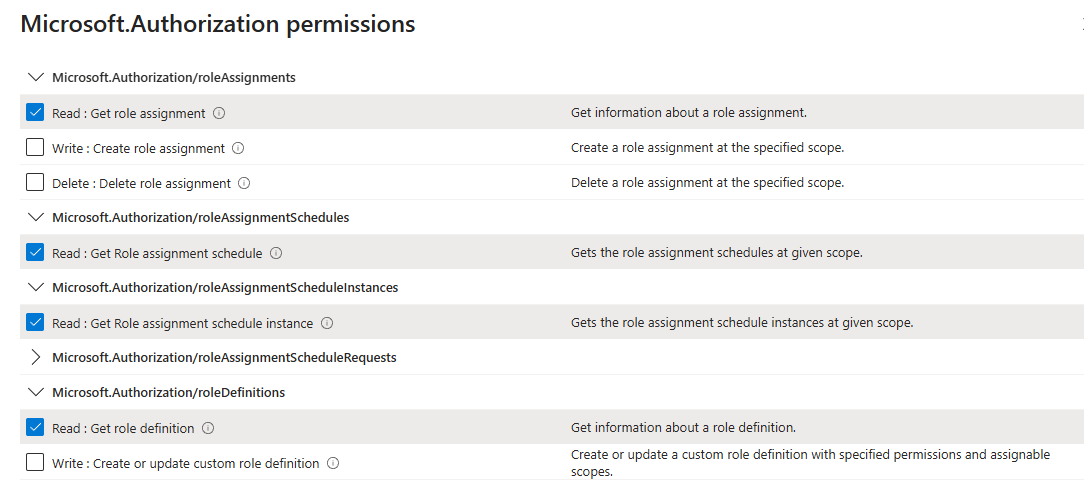
- Select:
- Microsoft.Authorization/roleAssignments -> Read
- Microsoft.Authorization/roleAssignmentSchedules -> Read
- Microsoft.Authorization/roleAssignmentScheduleInstances -> Read
- Microsoft.Authorization/roleDefinitions -> Read
- Click “Add”, then “Review + create”, then “Create”, before a final “OK” modal
- Assign the custom role
- Go to back to the subscription IAM page and click “Add” then “Add role assignment”
- Search for “Trustle IAM Reader” and click on it, then click “Next” at the bottom of the page
- Click “Select members” and then add the App Registration
- Click “Review + assign” twice
- When this completes, you should be taken back to the “Access Control (IAM) page and you should see the app registration with the new custom role.
Why this is needed: Role Reader permissions provide access to basic role details that complement the API permissions for comprehensive analysis of user's privileges.
Step 6 [Optional]: Test and Verify Configuration
Let's ensure everything is configured correctly before entering credentials into Trustle.
Instructions:
- Verify App Registration
- In "App registrations," confirm your app exists
- Check that all required API permissions are granted with admin consent
- Verify client secret is created and saved
- Test Permission Access
- In your app registration, go to "API permissions"
- All permissions should show "Granted for [Organization]" status
- No permissions should show "Not granted" or require additional consent
- Verify Directory Role Assignment
- Go to "Roles and administrators" > "Directory Readers"
- Confirm your app registration appears in the assignments
- Check Log Analytics Configuration
- In Azure Portal, verify the Log Analytics workspace exists
- Confirm diagnostic settings are active and collecting data
- Verify the app registration has "Log Analytics Reader" access
Configuration Summary: Your app registration now has:
- Read / Update Access to Users: Complete user profile and status
- Read / Update Access to Groups: Group memberships
- Read Access to Applications: Service principals and role assignments
- Audit Log Access: Sign-in patterns and security events
- Directory Information: Tenant-level organizational data
- Activity Monitoring: Azure resource activity through Log Analytics
Step 7: Enter Information into Trustle
Once setup is complete, enter the following information into Trustle:
Required Information:
- Tenant ID (Directory ID)
- Application (Client) ID
- Client Secret Value
- Workspace ID Value
What Happens Next:
- Initial Discovery: Trustle imports group memberships and role assignments for all accounts
- Activity Analysis: Analyzes 30 days of activity and identifies unused permissions and users
- Dashboard Population: The IAM dashboard populates with the findings
- Ongoing Monitoring: Periodic imports and analysis will show any changes in these findings
Support and Troubleshooting
If you encounter any issues during setup or have questions about the configuration:
Common Issues:
- Permission Consent Errors: Ensure you're using a Global Administrator account
- Missing Client Secret: This value is only shown once — recreate it if lost
- Log Analytics: Confirm proper IAM role assignment
- API Permission: Verify all are Application type, granted, and approved
Getting Help:
- Contact the Trustle technical support team with specific error messages
- Provide:
- Your Tenant ID and Application ID for faster troubleshooting
- Screenshots or audit log samples (if available)
- Error messages or descriptions