Connecting Google Cloud Platform
Provide Trustle with a service account and custom role optimized for IAM management
Overview
IMPORTANT: Before configuring the Google Cloud Platform (GCP) in Trustle, connect the Identity Provider where GCP users and groups are managed.
GCP best practices require a service account for Trustle to manage your users and IAM policies from the APIs. By assigning minimal, specific permissions to a custom role, Trustle manages across all GCP projects without requiring super administrator access.
What you'll need:
For Trustle:
- The JSON key file for the Trustle service account (downloaded during setup)
For Google Cloud Console:
- Project IAM Admin or Owner permissions to create roles and service accounts
- The specific IAM permissions listed in this document for creating the custom role
Step 1: Create the Custom Role
- Navigate to IAM & Admin
- Sign in to the Google Cloud Console
- Search for IAM & Admin in the search bar and select the result

- Ensure your organization is selected from the dropdown list (not a project or folder)
- Click the navigation menu (☰) in the top-left corner
- Navigate to IAM & Admin > Roles
- Create a New Role
- Click the + CREATE ROLE button at the top of the page
- In the "Create Role" form, fill in the following:
- Title: Enter a descriptive name (e.g., "SaaS Integration Viewer")
- Description: Add a description (e.g., "Custom role for SaaS integration with read-only IAM permissions")
- ID: This will auto-generate based on your title, or you can customize it
- Role launch stage: Select General Availability
- Add Required Permissions
- Click the ADD PERMISSIONS button
- In the filter box, search for and add each permission one by one:
resourcemanager.projects.get
resourcemanager.projects.list
resourcemanager.projects.getIamPolicy
resourcemanager.projects.setIamPolicy
resourcemanager.organizations.get
resourcemanager.organizations.getIamPolicy
resourcemanager.organizations.setIamPolicy
resourcemanager.folders.list
resourcemanager.folders.get
resourcemanager.folders.getIamPolicy
resourcemanager.folders.setIamPolicy
iam.serviceAccounts.list
iam.roles.list
iam.roles.get
iam.serviceAccountKeys.list
logging.logEntries.list
logging.privateLogEntries.list
logging.logs.list
- Verify that all permissions are listed in the "Assigned permissions" section
- Click the CREATE button at the bottom of the page
- Note down the role name/ID for use in the next steps
Step 2: Create the Service Account
Important: When creating this service account, it’s generally best practice to create a dedicated project for this service account for security and isolation but you may have an existing account for this purpose you want to use. However, you MUST have the IAM API and Cloud Resource Manager API enabled for this project.
- Navigate to Service Accounts
- From the navigation menu (☰), go to IAM & Admin > Service accounts
- Create New Service Account
- Click the + CREATE SERVICE ACCOUNT button at the top of the page
- Configure Service Account Details
- Step 1 - Service account details:
- Service account name: Enter a descriptive name (e.g., "saas-integration-account")
- Service account ID: This auto-generates from the name, or you can customize it
- Service account description: Add a description (e.g., "Service account for SaaS platform integration")
- Click CREATE AND CONTINUE
- Step 1 - Service account details:
- Skip Optional Steps (for now)
- Step 2 - Grant this service account access to project:
- Skip this step for now (we'll assign the role in section 3)
- Click CONTINUE
- Step 3 - Grant users access to this service account:
- This is optional and can be skipped
- Click DONE
- Step 2 - Grant this service account access to project:
Step 3: Assign the Role to the Service Account and Generate the Key
Assign the Custom Role
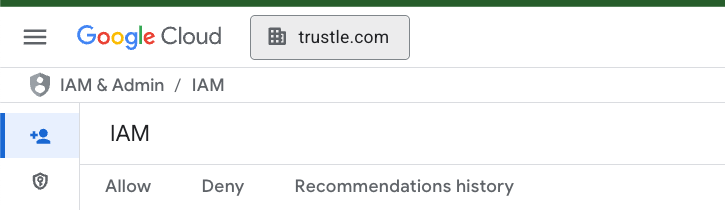
- Navigate to IAM
- From the navigation menu (☰), go to IAM & Admin > IAM
- Add Role Binding
- Click the GRANT ACCESS button at the top of the page
- Configure Access
- In the "Add principals" field:
- Enter the service account email (format:
service-account-name@project-id.iam.gserviceaccount.com) - You can find this email by going to IAM & Admin > Service accounts if you need to copy it
- Enter the service account email (format:
- In the "Assign roles" section:
- Click the Select a role dropdown
- In the filter box, type the name of your custom role created in Step 1
- Select your custom role from the filtered results
- Click SAVE
- In the "Add principals" field:
Generate and Download the JSON Key File
- Navigate Back to Service Accounts
- From the navigation menu (☰), go to IAM & Admin > Service accounts
- Access the Service Account
- Find your newly created service account in the list
- Click on the service account email address to open its details page
- Create a New Key
- Click on the KEYS tab at the top of the service account details page
- Click the ADD KEY dropdown button
- Select Create new key
- Generate JSON Key
- In the dialog that appears:
- Select JSON as the key type (should be selected by default)
- Click CREATE
- In the dialog that appears:
- Save the Key File
- The JSON key file will automatically download to your computer
- Important: Save this file securely - it contains sensitive credentials
- This file will be named something like project-id-xxxxx.json
- You cannot download this key again, so store it safely
- Security Best Practices
- Store the JSON key file in a secure location
- Never commit this file to version control
- This key file is what you'll upload to Trustle on the connections page
- Consider setting up key rotation policy
Step 4: Connect from Trustle UI
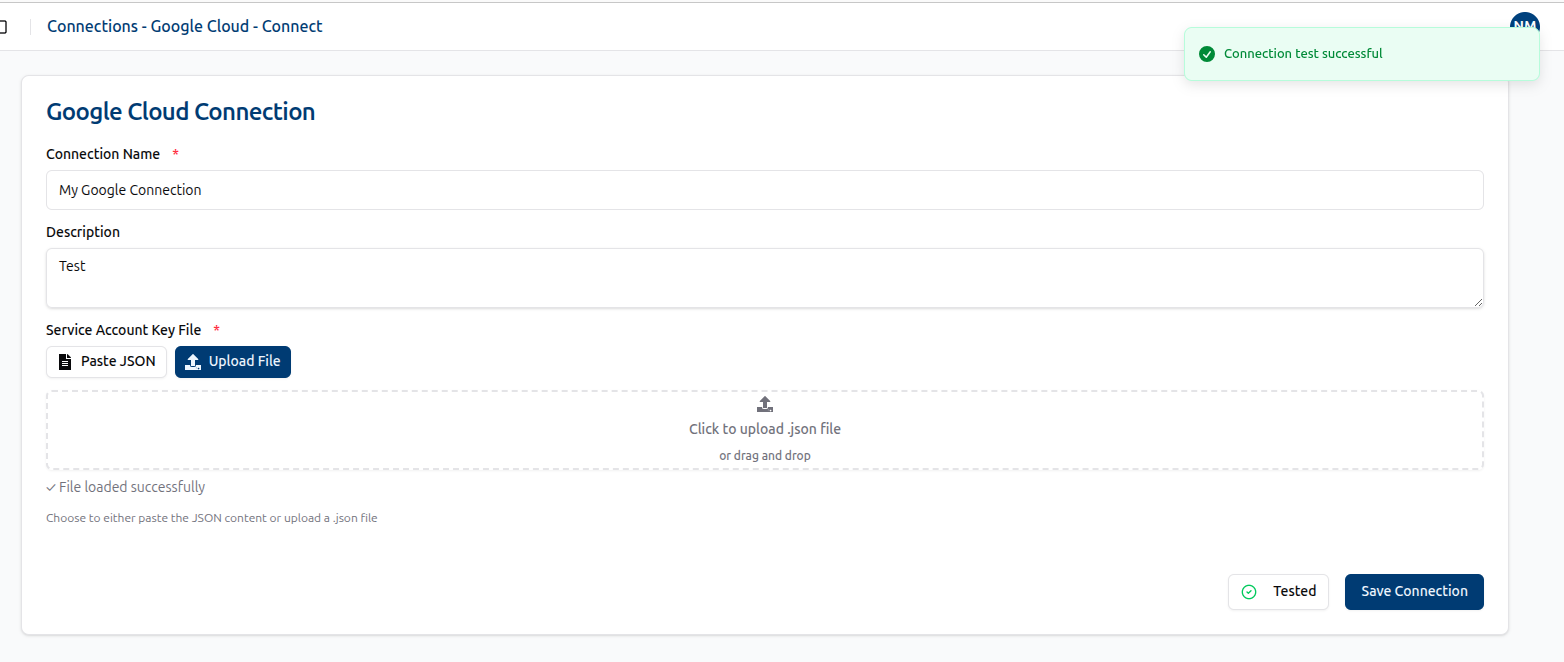
1. Navigate to the Connections page and locate Google Cloud under the Cloud Providers section. Click the + Connect button to begin.
2. On the Google Cloud Connect page, provide a Name and Description for the new connection. For the Service Account Key File, you can either paste the JSON content or upload the corresponding JSON file.
Example JSON:
{
"type": "service_account",
"project_id": "trustle-example",
"private_key_id": "907fbc88218d334a84772f79aaee72630fd8b0bc",
"private_key": "-----BEGIN PRIVATE KEY-----\nMIIiZMn5X3+S8iYKeMaWz4ZPJYXH1\nS2FF0M6dQyKdlwwYw0bUrw==\n-----END PRIVATE KEY-----\n",
"client_email": "sa-trustle-connector-customer@trustle-staging.iam.gserviceaccount.com",
"client_id": "112160954452881678260",
"auth_uri": "https://accounts.google.com/o/oauth2/auth",
"token_uri": "https://oauth2.googleapis.com/token",
"auth_provider_x509_cert_url": "https://www.googleapis.com/oauth2/v1/certs",
"client_x509_cert_url": "https://www.googleapis.com/robot/v1/metadata/x509/sa-trustle-connector-customer%40trustle-example.iam.gserviceaccount.com",
"universe_domain": "googleapis.com"
}
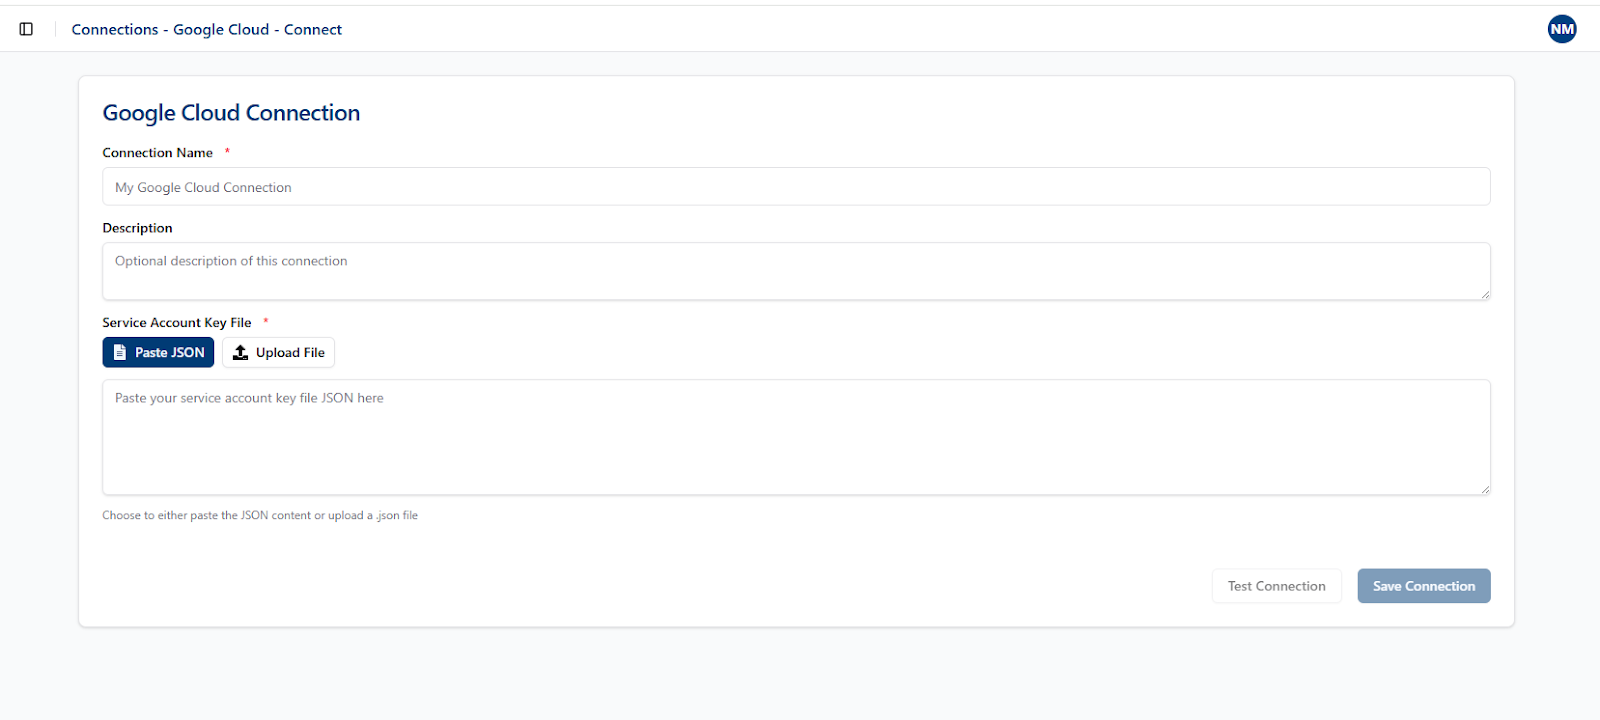
3. Click Test Connection. If the connection is valid, the Save Connection button becomes available. Click Save to finish.